What is the key to successful set up of Continuous Delivery on projects? Well-coordinated work of development, testing and infrastructure engineers. Thanks, cap, as they say 🙂 But how to put it into practice? In this article, we will share our best practices on how to organize and implement all of this.
We have summarized the basic basics into one cheat sheet for ourselves and share with you:
- What are the requirements and how they are characterized,
- Types of tasks and the order of their description in Issue tracker,
- How to make User story and Tech story,
- How to describe bugs
- Setting up the deployment pipeline.
Experienced engineers are unlikely to learn anything new from this article, but we hope that this information will be useful to beginners.
What are the requirements and how are they characterized
Each project has a number of requirements. It is important to understand all of them and not to confuse them.
Business requirements determine what the system should do from a business perspective.
For example: the application should allow the user to sell tickets and additional services in order to increase sales of agents.
User requirements describe the goals and objectives of users who will work in the system to implement business requirements. User requirements are often presented as User cases.
For example: as a user, I need to sell services for miles.
Functional requirements – what the system should do. Determine the functionality (behavior) of the system that must be created by developers so that users can fulfill user requirements.
Non-functional requirements – how the system should work. This includes requirements for performance, quality, limitations, usability, etc.
Types of tasks and the order of their description in Issue tracker
So, we have described the types of requirements. Now we will divide them into types of tasks, decipher each type and tell how to describe it correctly.
Let’s start with Epic.
Epic is a common task, in which all User Stories are collected taking into account the development time of the service. It describes the main purpose of a product or service. The main goal of Epic is to collect tasks and store them in one place no matter what new requirements are put forward to the product. Epic is always more than a user story and may not even fit in one iteration.
The solution of the Epic problem allows you to create MVP (Minimal Viable Product) – the minimum viable product. In other words, what needs to be released in order to learn and adapt the product based on feedback from end users.
How is Epic different from User Story?
Epic is just a big user story, the hallmark of which is the presence of a clear value to the user.
Starting to form user stories, i.e., collecting requirements for a project, we usually move from general to particular – first we determine the concept of the project, select the main persons (users of the system), create a list of the main features, and then we detail these features in separate wishes – User story.
The process of Epic creation is as follows:
- Title – the name of the new functionality.
- Description – is written according to the pattern:The role of the user (as such a user, I …) / User action (I want to do something …) / The result of the action (to get such a result that …) / Interest or benefit (will allow me to get such and such benefits …).
- A sample implementation plan or a short description of the main User Stories that will be implemented as part of Epic with MVP.
- Attachments – Attach correspondence, technology and other necessary information.
How to make User story and Tech story
The difference between User story and Tech story is that Tech Story refers to functional requirements that need to be taken into account and described in the task when developing the product. And in the role of consumers here are parts of the system.
Describing them is easy. The main thing to remember is why all this is being done.
The user story description order is pretty standard:
- Summary / Title – a brief description of the new functionality or improvements in a language that is understandable to the customer.
- Description includes the main goal and the desired result. Like, , I , with the goal of .
- Acceptance Criteria is a list of priority product criteria. That is, a measurable definition of what should be done with the product so that it is accepted by the project stakeholders.
- Technical notes, models, layouts, page layouts.
- Attachments – all necessary technologies, documents, correspondence with the customer.
How to describe bugs
What information should be indicated when reporting a bug:
- Title / Summary / Title briefly describes the essence of the error and indicates the location of the problem.
- Description contains the following steps: – how to reproduce the error / playback steps; – current result; Expected Result
- Attachments / Attachments – all the necessary logs, screenshots, links to Kibana and other files.
- Environment – a mark in which environment the error is reproduced, and the category to which the problem belongs. For example, error on UI, CORE error, SWS error, etc.
- Priority will allow each member of the team to assess the severity of the problem, and the manager to see it in the list of first candidates for sprint.
And do not forget to set the correct priority level 🙂
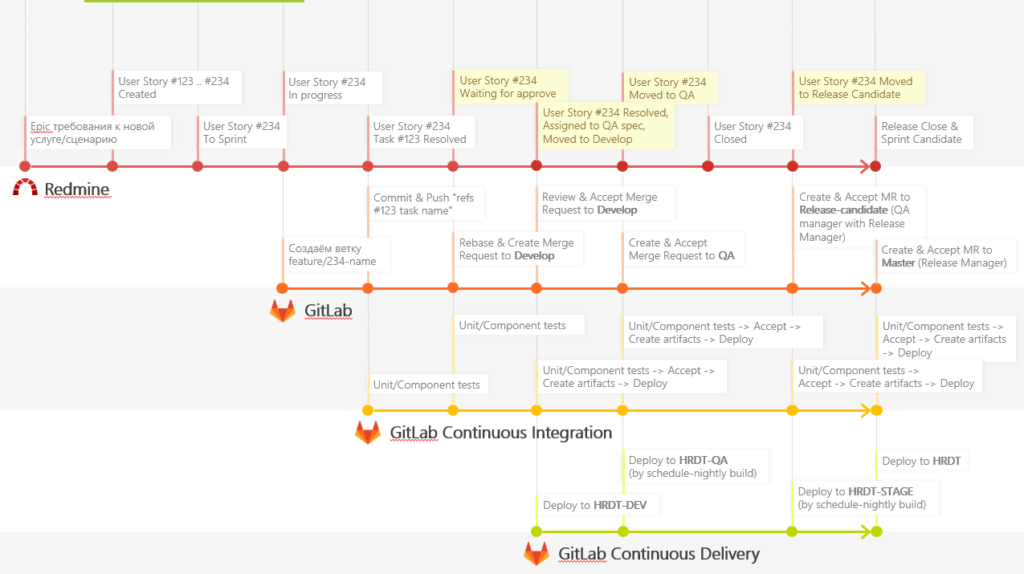
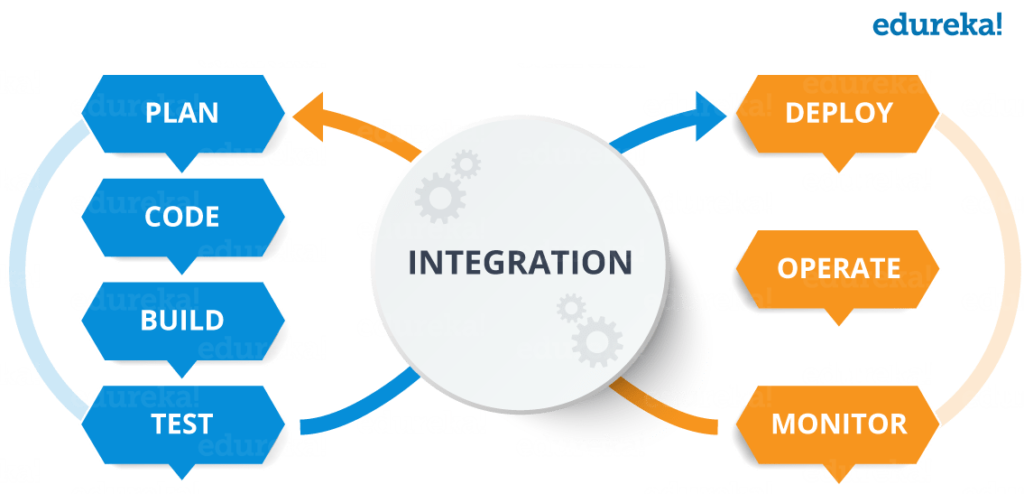
Now that we’ve figured out the general principles of work, we’ll tell you how to organize the deployment pipeline.
Deployment Pipeline Configuration
To speed up the delivery of our services to production, we introduce a new deployment pipeline and use GitFlow to work with code.
To do this quickly and dynamically, we deployed several GitLab-runners that ran all the tasks for developers to push. Thanks to the approach of GitLab Flow, we have several servers: Develop, QA, Release-candidate and Production.
Continuous Integration began to collect and run tests for each commit, run unit tests and integration tests, add artifacts to the application delivery.
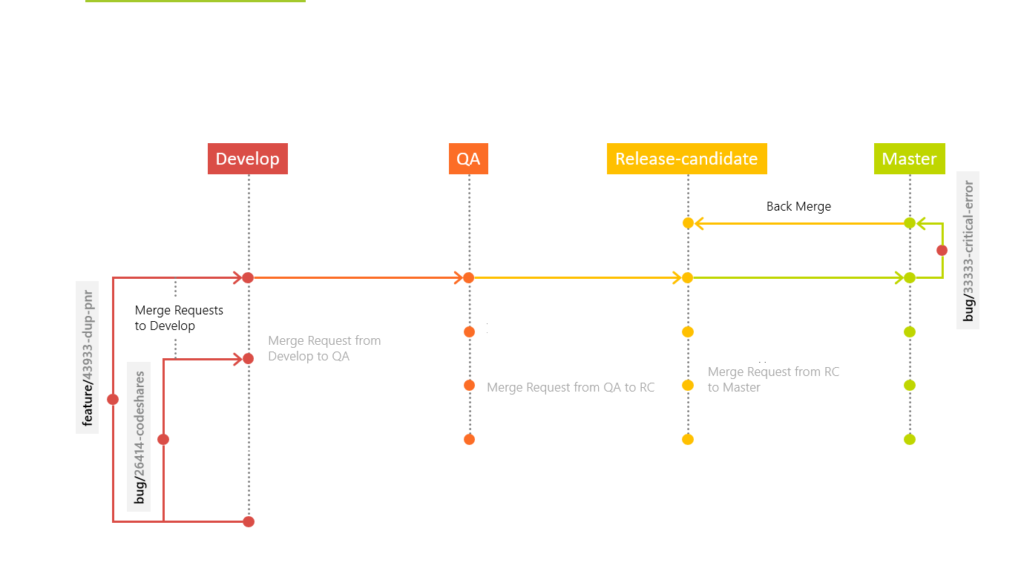
Development takes place like this:
The developer adds new functionality in a separate branch (feature branch). After that, he creates a request to merge his branch with the main branch of development (Merge Request to Develop branch).
Other developers look at the merge request, accept it (or not) and correct the comments. After merging, a special environment unfolds in the trunk branch, on which tests for raising the environment are performed.
When all these stages are completed, the QA engineer takes the changes to his “QA” branch and conducts testing.
If the QA engineer agrees on the work done, the changes go to the Release-Candidate branch and deploy to an environment that is accessible to external users. In this environment, the customer accepts and verifies technologies. Then we distill everything into Production.
If at some stage there are errors, then it is in this branch that we solve them, after which we post the result in Develop.
We also made a small plugin so that Redmine can tell us what stage the feature is at. This helps testers to evaluate at what stage you need to connect to the task, and developers to correct errors. So they see at what stage the failure occurred, can go to a specific branch and play it there.
Useful links:

About The Author: Yotec Team
More posts by Yotec Team