
Building web application and hosting it on a web server is insanely easy with ASP.NET and IIS. But there are lots of opportunities and hidden configurations which can be tweaked that can make it high performance web application. In this series post, we are going to discuss some of the most unused or ignored tricks which can be easily applied to any web application.
1. Kernel mode cache
It is one of the primary tools widely used for writing making web application faster. But most of the times, we don’t use it optimally and just leave some major benefits. As each asp.net request goes through various stages, we can implement caching at various level as below
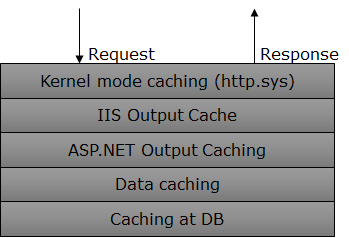
We can see that request is first received by http.sys so if it is cached at kernel level, then we can save most of the time spent on server as http.sys is a http listener which sits in OS kernel and listens the request directly from TCP layer. We can save all the time spent IIS/ASP.NET pipeline, page lifecycle, our custom code, time taken in DB etc. Let’s see how we can implement it.
- Go to IIS and select the web site.
- Click on Output Cache icon on right under IIS section
- In right panel, under Actions click on Add. Following dialog will open
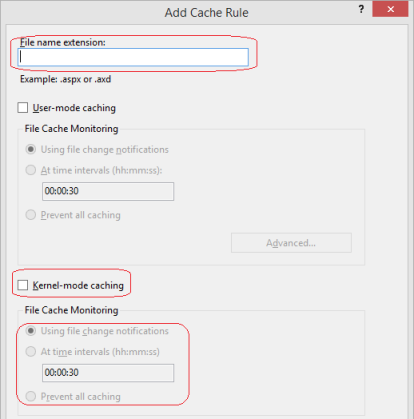
Here in red encircled area, we need to define that the file extensions which we want to cache at kernel. Second encircled area, we need to select the checkbox. Third encircled area show that there are three options is provided to invalidate the cache. Based on our requirement we can configure it.
Note – there are some limitation over caching in kernel level. As all the features of IIS are implemented at User level so we will not able leverage any of those. Refer this msdn article for complete list where kernel caching cannot be implemented.
2. Pipeline mode (Available on IIS 7+)
At application pool level, there are two pipeline modes available: classic and integrated. Classic is available to support the applications that were migrated from IIS6. So first let’s understand these modes. IIS provides many features which are implemented as modules in IIS and in similar way many feature are implemented as HTTP Module which are part of ASP.NET Pipeline. In case of classic mode, each request goes through first IIS pipeline and then ASP.NET pipeline before getting served. There are many features which are part of both the pipelines like Authentication etc. In case of Integrated mode, these two pipelines are merged into one and all the module (IIS and ASP.NET) are invoked from the single event as they come along which reduces the redundancy and very helpful in performance of an application.
To set/update the pipeline mode, select the desired application pool and right click properties
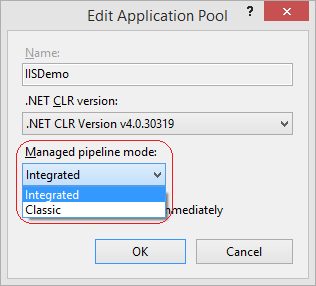
Here as encircled in the above pic, we can set the pipeline mode.
Note – Don’t go for blindly changing it, if your application migrated from IIS6 then there could be some dependency over it. After changing thoroughly test it before moving ahead.
3. Remove unused Modules
Each request has go through ASP.NET Pipeline which contains many http modules and at the end one http handler, which serves the request as below
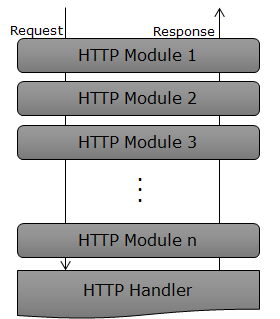
We can see here the request goes through the each modules, processed by the handler then again come though again via the same modules. Let’s see how many modules are by default enabled in an ASP.NET Application. I have added the below code to get all the modules
HttpApplication httpApps = HttpContext.ApplicationInstance;
//Get list of active modules
HttpModuleCollection httpModuleCollections = httpApps.Modules;
ViewBag.ModulesCount = httpModuleCollections.Count;
And this collection can be bound to any control and it displays as
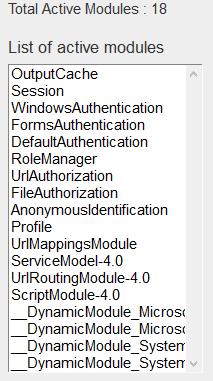
It is showing eighteen modules which some of them we may not be using but each request gets has to though these all modules. So we can remove these modules from the pipeline. To remove a module, we just require to add configuration in web.config as
<system.webServer>
<modules>
<remove name=“FormsAuthentication“ />
<remove name=“DefaultAuthentication“ />
<remove name=“OutputCache“ />
<remove name=“AnonymousIdentification“ />
<remove name=“RoleManager“ />
modules>
system.webServer>
Here we list down the modules that we want to remove with remove tag. Now as we added here remove five modules, next time when we will check the active modules, it will be thirteen.
Note – for this demo I have used VS 2013. You may get different number when using another version, but the key point is that you should remove all the modules which are not required.
More tips coming soon 😉
Source: Infragistics


About The Author: Yotec Team
More posts by Yotec Team