Why is CI necessary? Our experience
Prior to CI integration , it was difficult to monitor the health of a project and maintain manual testing without validating changes. And for each commit, I had to run 15+ commands to check and build. If your application has a stable release cycle, this is very inconvenient.
After the integration of CI , the amount of “manual labor” decreased, the reliability of the project and the quality of the code increased, and the Time-to-Market decreased.
Defining CI Goals
For an example of setting up CI, we took the standard goals:
- validation of changes (Lint, Test),
- assembly for the test bench,
- release builds.
Create an environment
It will not be possible to immediately describe tasks for pipelines. We need to make sure that we have variables and workflow described.
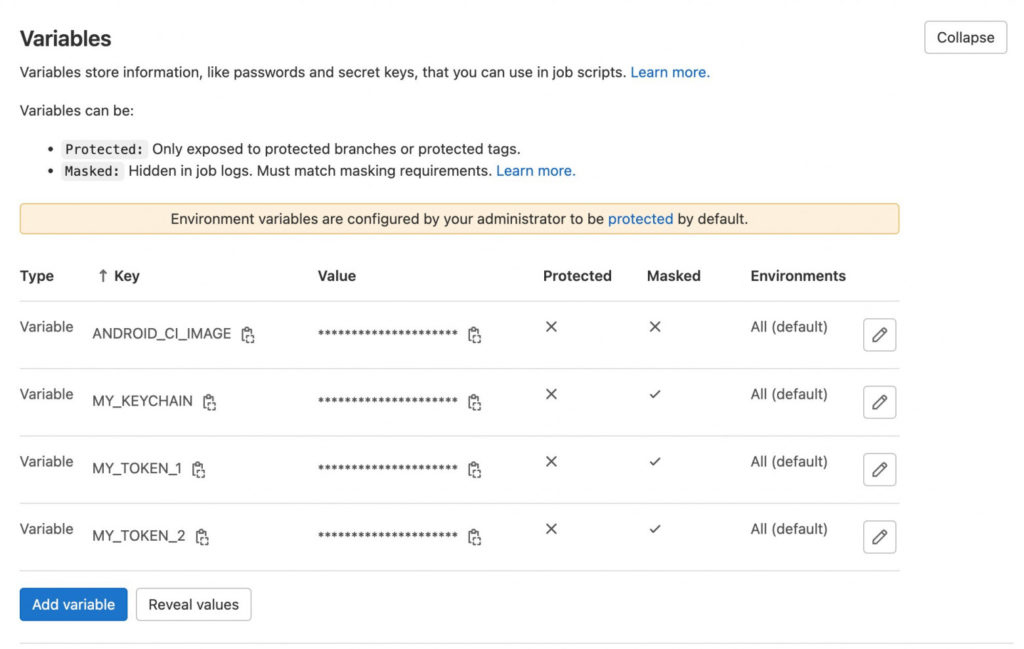
Description of variables . Let’s add the necessary variables to the project environment:
- ANDROID_CI_IMAGE – docker image with Android SDK preinstalled,
- MY_KEYCHAIN - application signing certificate,
- MY_TOKEN_1, MY_TOKEN_2 – any other required tokens. For example, to access Firebase.
Description of the workflow . You need to define the types of pipelines. There are 3 of them for our purposes:
- release,
- staging,
- merge_request.
Let’s write launch conditions for each type of pipeline.
stages:
  - test # Этап проверки кода
  - build # Этап сборки кода
  - deploy # Этап деплоя сборки

workflow:
  rules:
    - if: $CI_COMMIT_TAG # Если был git tag
      variables:
        PIPELINE_TYPE: "release"
    - if: $CI_COMMIT_BRANCH == "master" # Если ветка -- master
      variables:
        PIPELINE_TYPE: "staging"
    - if: $CI_PIPELINE_SOURCE == "merge_request_event" # Если это Merge Request
      variables:
        PIPELINE_TYPE: "merge_request"
    - when: never
Now we can proceed to the description of tasks.
Now we can proceed to the description of tasks.
Describe the key steps of the pipeline
For example, let’s figure out how to describe the three key steps of the pipeline:
- linters and tests,
- assembly,
- deploy.
Note that the last two steps are not run to validate the changes.
Linters and tests
For Android , run JUnit.
junit:
  image:
    name: $ANDROID_CI_IMAGE # Используем контейнер с Android SDK
  stage: test # Этап проверки кода
  before_script:
    - cd ./android # Для React Native проекта
  script:
    - ./gradlew testDebugUnitTest # Запускаем JUnit
  rules:
    - if: $PIPELINE_TYPE # Для любого типа пайплайнов
      changes:
        - "**/*.{kt,java}" # Если были изменения в .kt или в .java
      when: always
    - when: never
We also start Ktlint.
ktlint:
  image:
    name: $ANDROID_CI_IMAGE # Используем контейнер с Android SDK
  stage: test # Этап проверки кода
  before_script:
    - cd ./android # Для React Native проекта
  script:
    - ktlint --verbose --color "android/**/*.kt" # Запускаем KtLint
  rules:
    - if: $PIPELINE_TYPE # Для любого типа пайплайнов
      changes:
        - "**/*.{kt,java}" # Если были изменения в .kt или в .java
      when: always
    - when: never
For iOS , launch xcodebuild test.
xcode-test:
  stage: test # Этап проверки кода
  before_script:
    - cd ./ios # Для React Native проекта
  script:
    # Запускаем тесты XCode
    - xcodebuild \
      -project demoMobileCI.xcodeproj \
      -scheme demoMobileCI \
      -destination 'platform=iOS Simulator,name=iPhone 8,OS=15.2'\
	test
  tags:
    - osx-runner # Запускаем на машине с MacOS и XCode
  rules:
    - if: $PIPELINE_TYPE # Для любого типа пайплайнов
      changes:
        - "**/*.{swift}" # Если были изменения в .swift
      when: always
    - when: never
If you are using React Native , you should also add jobs to JavaScript and TypeScript tests.
Example scripts in package.json:
{
	"lint": "eslint . --ext .js,.jsx,.ts,.tsx",
	"tsc": "tsc --project tsconfig.json --noEmit",
	"test": "jest --silent",
}
# Для React Native проекта #
eslint:
image:
name: $NODE_CI_IMAGE # Используем контейнер с Node.JS
stage: test # Этап проверки кода
before_script:
- yarn install # Устанавливаем node_modules
script:
- yarn lint # Запускаем Eslint
rules:
- if: $PIPELINE_TYPE # Для любого типа пайплайнов
changes:
- "**/*.{js,jsx,ts,tsx}" # Если были изменения в JS или TS
when: always
- when: never
jest:
image:
name: $NODE_CI_IMAGE # Используем контейнер с Node.JS
stage: test # Этап проверки кода
before_script:
- yarn install # Устанавливаем node_modules
script:
- yarn test # Запускаем NPM тесты
rules:
- if: $PIPELINE_TYPE # Для любого типа пайплайнов
changes:
- "**/*.{js,jsx,ts,tsx}" # Если были изменения в JS или TS
when: always
- when: never
typescript:
image:
name: $NODE_CI_IMAGE # Используем контейнер с Node.JS
stage: test # Этап проверки кода
before_script:
- yarn install # Устанавливаем node_modules
script:
- yarn tsc # Запускаем typescript compiler
rules:
- if: $PIPELINE_TYPE # Для любого типа пайплайнов
changes:
- "**/*.{js,jsx,ts,tsx}" # Если были изменения в JS или TS
when: always
- when: neverAssembly
If you are building against a master branch or release, the application must be signed with a .
For Android , run ./gradlew assembleRelease.
Important : You need a docker image that has the Android SDK installed.
gradle-build:
  image:
    name: $ANDROID_CI_IMAGE # Используем контейнер с Android SDK
  stage: build # Этап сборки кода
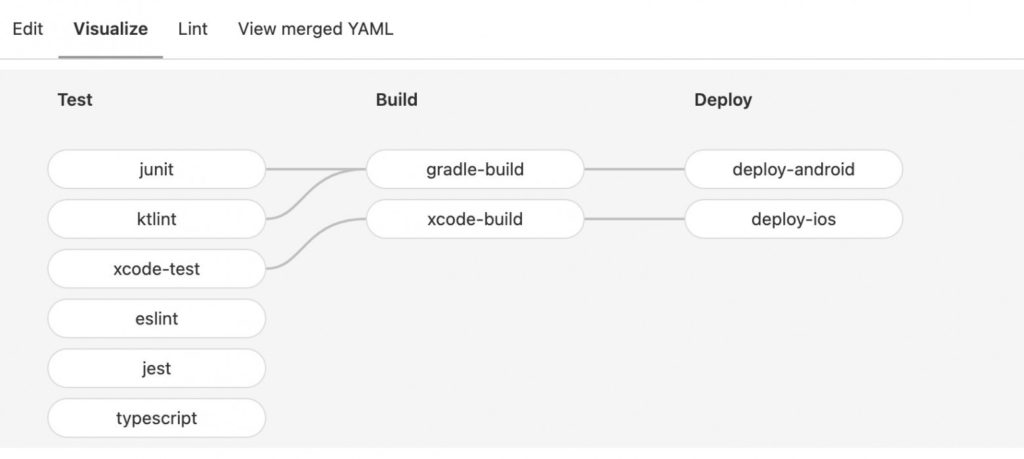
  needs: ["junit", "ktlint"]
  before_script:
    - cd ./android # Для React Native проекта
  script:
    - ../gradlew assembleRelease # Запускаем сборку
    - cp android/app/build/outputs/bundle/release/app-release.aab .
  artifacts:
    expire_in: 1 months
    paths:
      - app-release.aab # Путь к AAB / APK
  rules:
    - if: $PIPELINE_TYPE != "merge_request" # Запускаем только для master-ветки и релизов
      when: always
    - when: never
For iOS , launch xcodebuild build.
Important : Requires gitlab-runner to be running on MacOS.
xcode-build:
  stage: build # Этап сборки кода
  needs: ["xcode-test"]
  before_script:
    - cd ./ios # Для React Native проекта
  script:
    # Запускаем сборку XCode
    - xcodebuild \
      -project demoMobileCI.xcodeproj \
      -scheme demoMobileCI \
      -destination 'platform=iOS Simulator,name=iPhone 8,OS=15.2' \
      build
    - cp ios/builds/results/demoMobileCI.ipa .
  artifacts:
    expire_in: 1 months
    paths:
      - demoMobileCI.ipa # Путь к IPA
  tags:
    - osx-runner # Запускаем на машине с MacOS и XCode
  rules:
    - if: $PIPELINE_TYPE != "merge_request" # Запускаем только для master-ветки и релизов
      when: always
    - when: never
Deploy
In our example, the deployment will take place in Firebase . You can also use Fastlane to upload to the AppStore and GooglePlay .
For Android , in needs we specify gradle-build.
deploy-android:
  image:
    name: $FIREBASE_IMAGE # Контейнер с установленным <https://github.com/firebase/firebase-tools>
  stage: deploy # Этап деплоя сборки
  needs: ["gradle-build"]
  script:
    - firebase appdistribution:distribute app-release.aab --app $MY_APP_ID --groups "QAMobile" --token "$MY_TOKEN_1"
  rules:
    - if: $PIPELINE_TYPE == "release" # Запускаем только для релизов
      when: always
    - when: never
For iOS , specify in needs xcode-build.
deploy-ios:
  image:
    name: $FIREBASE_IMAGE # Контейнер с установленным <https://github.com/firebase/firebase-tools>
  stage: deploy # Этап деплоя сборки
  needs: ["xcode-build"]
  script:
    - firebase appdistribution:distribute demoMobileCI.ipa --app $MY_APP_ID --groups "QAMobile" --token "$MY_TOKEN_1"
  rules:
    - if: $PIPELINE_TYPE == "release" # Запускаем только для релизов
      when: always
    - when: never
Eventually
What happened . We have created a pipeline with the necessary structure, which allows you to validate changes and build an application for testing and for release.
What can be improved . This is a simple implementation of CI, which is far from ideal. Here is what can be added to improve CI:
- caching,
- GitLab Releases, Badges,
- CI encapsulation in a separate repository,
- automatic branching,
- management of Merge Requests using CI, Codeowners,
- autotest,
- automation and integration with Jira, Slack, Confluence.






About The Author: Yotec Team
More posts by Yotec Team